
Products Category
- FM Transmitter
- 0-50w 50w-1000w 2kw-10kw 10kw+
- TV Transmitter
- 0-50w 50-1kw 2kw-10kw
- FM Antenna
- TV Antenna
- Antenna Accessory
- Cable Connector Power Splitter Dummy Load
- RF Transistor
- Power Supply
- Audio Equipments
- DTV Front End Equipment
- Link System
- STL system Microwave Link system
- FM Radio
- Power Meter
- Other Products
- Special for Coronavirus
Products Tags
Fmuser Sites
- es.fmuser.net
- it.fmuser.net
- fr.fmuser.net
- de.fmuser.net
- af.fmuser.net ->Afrikaans
- sq.fmuser.net ->Albanian
- ar.fmuser.net ->Arabic
- hy.fmuser.net ->Armenian
- az.fmuser.net ->Azerbaijani
- eu.fmuser.net ->Basque
- be.fmuser.net ->Belarusian
- bg.fmuser.net ->Bulgarian
- ca.fmuser.net ->Catalan
- zh-CN.fmuser.net ->Chinese (Simplified)
- zh-TW.fmuser.net ->Chinese (Traditional)
- hr.fmuser.net ->Croatian
- cs.fmuser.net ->Czech
- da.fmuser.net ->Danish
- nl.fmuser.net ->Dutch
- et.fmuser.net ->Estonian
- tl.fmuser.net ->Filipino
- fi.fmuser.net ->Finnish
- fr.fmuser.net ->French
- gl.fmuser.net ->Galician
- ka.fmuser.net ->Georgian
- de.fmuser.net ->German
- el.fmuser.net ->Greek
- ht.fmuser.net ->Haitian Creole
- iw.fmuser.net ->Hebrew
- hi.fmuser.net ->Hindi
- hu.fmuser.net ->Hungarian
- is.fmuser.net ->Icelandic
- id.fmuser.net ->Indonesian
- ga.fmuser.net ->Irish
- it.fmuser.net ->Italian
- ja.fmuser.net ->Japanese
- ko.fmuser.net ->Korean
- lv.fmuser.net ->Latvian
- lt.fmuser.net ->Lithuanian
- mk.fmuser.net ->Macedonian
- ms.fmuser.net ->Malay
- mt.fmuser.net ->Maltese
- no.fmuser.net ->Norwegian
- fa.fmuser.net ->Persian
- pl.fmuser.net ->Polish
- pt.fmuser.net ->Portuguese
- ro.fmuser.net ->Romanian
- ru.fmuser.net ->Russian
- sr.fmuser.net ->Serbian
- sk.fmuser.net ->Slovak
- sl.fmuser.net ->Slovenian
- es.fmuser.net ->Spanish
- sw.fmuser.net ->Swahili
- sv.fmuser.net ->Swedish
- th.fmuser.net ->Thai
- tr.fmuser.net ->Turkish
- uk.fmuser.net ->Ukrainian
- ur.fmuser.net ->Urdu
- vi.fmuser.net ->Vietnamese
- cy.fmuser.net ->Welsh
- yi.fmuser.net ->Yiddish
How to Create New Grooves Using Ableton Live’s Slice to MIDI
Date:2020/3/6 11:54:03 Hits:
Ableton Live 9 is a killer DAW that has so many features to help making music fun, exciting, inspiring, and different. Live’s Slice to MIDI function is just one of those features. Let’s get into it and very soon you’ll be making a new groove.
The crux of this How-To article is to show you how Ableton Live can slice up any audio file and automatically map it to MIDI notes so so you can play those slices from a MIDI controller or MIDI sequence. You can use a keyboard, or a Novation Launchpad, Ableton’s PUSH controller, or even an electronic drumkit. Anything that sends MIDI notes can be used — let’s get into it!
Step 1: Create a new LIVE set that has at least one audio track.
Step 2: Drag a loop into the audio track. I’m working with a drum loop for purposes of this article but you can do this with any audio file or sample.
Step 3: Double-click on the loop and it will open in the edit window at the bottom of the screen. There you can see what kind of transients your loop has, and you can evaluate how you want the audio sliced.
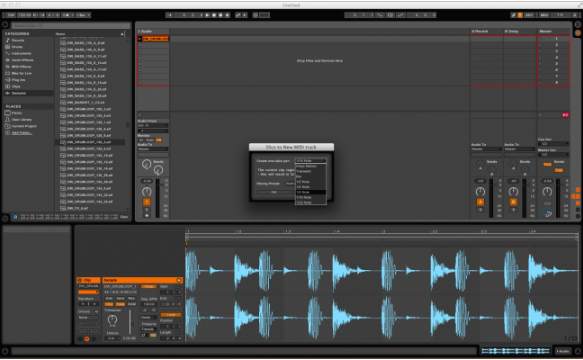
Step 4: Put your cursor over the loop and control-click (right-click). A contextual menu will open. Scroll down to where it says “Slice To New MIDI Track.”
Step 5: A new menu opens where you can choose the values that you want. The loop I have for this demonstration is a pretty simple one and I only needed it to chop the loop at every eighth-note. As you can see in the picture, you can pick a number of different values. A good one to choose if your loop was not recorded to a click track, or maybe you have a loop with vocals or other non-percussive sounds, is the Transient option. It will chop the sample at every loud transient and you can get some really cool little samples to mess around with out of a bigger loop.
Here is the magical part, when you click on the value you want to use, Ableton Live automatically slices the sample to the value you chose, creates a new MIDI track, and maps the slices to MIDI notes.
At the bottom of the screen you’ll see grey boxes labeled “slice 1, slice 2, etc. You can re-name them if you like.
Step 6: Double-click on any of the grey boxes and you can see how the slice is cut within the loop.
Another way to see the slices is to double-click on the new MIDI scene that was created. All of the slices will show up as MIDI notes placed across the keys.
Here is where the fun begins: You can rearrange or play your slices however you want using MIDI notes or a MIDI controller. Make up entirely new beats and grooves with the same sounds of the original sample. How cool is that!
Fun Tricks
Here I dragged a reverb to slice number three, which has a snare sound. Now only that snare sound has the reverb on it. You can get very creative with this sort of thing and put all kinds of effects on the different slices.
If you would rather have an effect over all the slices all you have to do is drag that effect next to the the box that shows all of the slices at the bottom portion of the screen. The effect now will be across every slice.
This process is super quick and once you do it a few times; in fact, you will be amazed at how fast you can make something completely new. So take advantage of this great tool in Ableton Live and get your creative juices flowing!
Leave a message
Message List
Comments Loading...


