
Products Category
- FM Transmitter
- 0-50w 50w-1000w 2kw-10kw 10kw+
- TV Transmitter
- 0-50w 50-1kw 2kw-10kw
- FM Antenna
- TV Antenna
- Antenna Accessory
- Cable Connector Power Splitter Dummy Load
- RF Transistor
- Power Supply
- Audio Equipments
- DTV Front End Equipment
- Link System
- STL system Microwave Link system
- FM Radio
- Power Meter
- Other Products
- Special for Coronavirus
Products Tags
Fmuser Sites
- es.fmuser.net
- it.fmuser.net
- fr.fmuser.net
- de.fmuser.net
- af.fmuser.net ->Afrikaans
- sq.fmuser.net ->Albanian
- ar.fmuser.net ->Arabic
- hy.fmuser.net ->Armenian
- az.fmuser.net ->Azerbaijani
- eu.fmuser.net ->Basque
- be.fmuser.net ->Belarusian
- bg.fmuser.net ->Bulgarian
- ca.fmuser.net ->Catalan
- zh-CN.fmuser.net ->Chinese (Simplified)
- zh-TW.fmuser.net ->Chinese (Traditional)
- hr.fmuser.net ->Croatian
- cs.fmuser.net ->Czech
- da.fmuser.net ->Danish
- nl.fmuser.net ->Dutch
- et.fmuser.net ->Estonian
- tl.fmuser.net ->Filipino
- fi.fmuser.net ->Finnish
- fr.fmuser.net ->French
- gl.fmuser.net ->Galician
- ka.fmuser.net ->Georgian
- de.fmuser.net ->German
- el.fmuser.net ->Greek
- ht.fmuser.net ->Haitian Creole
- iw.fmuser.net ->Hebrew
- hi.fmuser.net ->Hindi
- hu.fmuser.net ->Hungarian
- is.fmuser.net ->Icelandic
- id.fmuser.net ->Indonesian
- ga.fmuser.net ->Irish
- it.fmuser.net ->Italian
- ja.fmuser.net ->Japanese
- ko.fmuser.net ->Korean
- lv.fmuser.net ->Latvian
- lt.fmuser.net ->Lithuanian
- mk.fmuser.net ->Macedonian
- ms.fmuser.net ->Malay
- mt.fmuser.net ->Maltese
- no.fmuser.net ->Norwegian
- fa.fmuser.net ->Persian
- pl.fmuser.net ->Polish
- pt.fmuser.net ->Portuguese
- ro.fmuser.net ->Romanian
- ru.fmuser.net ->Russian
- sr.fmuser.net ->Serbian
- sk.fmuser.net ->Slovak
- sl.fmuser.net ->Slovenian
- es.fmuser.net ->Spanish
- sw.fmuser.net ->Swahili
- sv.fmuser.net ->Swedish
- th.fmuser.net ->Thai
- tr.fmuser.net ->Turkish
- uk.fmuser.net ->Ukrainian
- ur.fmuser.net ->Urdu
- vi.fmuser.net ->Vietnamese
- cy.fmuser.net ->Welsh
- yi.fmuser.net ->Yiddish
6 New Time-saving Features in Pro Tools 2018
Date:2020/2/20 16:17:06 Hits:
When you dive into all the new workflow enhancements included in Pro Tools 2018, one thing is abundantly clear: Avid has been paying attention to customer feedback. Whether you’re a songwriter, composer, musician, producer, or mix engineer, this software is jam-packed with user-requested tools that are sure to boost your creativity. Below is a list of our six favorite time-saving features in Pro Tools 2018.
1. Batch Renaming
The Batch Track Rename dialog consists of four sections:
Section 1 — Replace. This section allows you to find and replace any alphanumeric character. A Regular Expressions checkbox enables searching and replacing using string search algorithms, which make complex matching and replacing commands a breeze. You enable or disable this section with Command + R (Mac) or Control + R (Win) key commands.
Section 2 — Trim. This section allows you to trim characters from the beginning or end of a track name, as well as a range of characters in the middle. You can also trim a combination of all the above. You enable or disable this section with Command + T (Mac) or Control + T (Win) key commands.
Section 3 — Add. This section allows you to add text to the beginning or end of a track name, or at any specified point within the name. You can also add a combination of all the above. You enable or disable this section with Command + D (Mac) or Control + D (Win) key commands.
Section 4 — Numbering. This section allows you to add alphanumeric characters at the beginning or end of a track name, at an index, in increasing increments, or with/without a separating character. You enable or disable this section with Command + N (Mac) or Control + N (Win) key commands.
The Batch Clip Rename dialog offers similar functionality, but you can rename clips in either timeline order or from the Clip List sort order. This allows you to rename clips based on the order that the files were recorded instead of how they appear on the timeline. This applies to any selected clips on the timeline or Clip List.
Batch renaming isn’t destructive — it doesn’t rename the files themselves. You can save up to five of your regularly used renaming operations as user presets, similar to zoom and clip effects. And like other Pro Tools dialogs, you can import and export your settings for use on other systems.
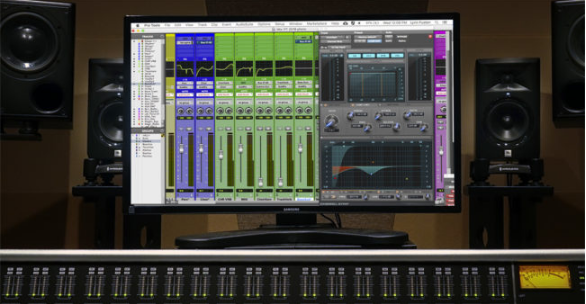
2. Mix Window EQ Graphs
Anyone who’s used Avid’s S6 console will attest to the benefit of its EQ Graph display. This brilliant feature gives you a useful at-a-glance overview of each track’s EQ curve. Pro Tools 2018 gives you similar functionality right inside your DAW.
This composite visual display shows you the combined effect of every EQ and filter on every individual channel of your mix. And you can see it all from the Mix Window without opening a single plug-in. Thanks to EQ Graph, you can fill your second monitor with something other than plug-in windows. This feature is ideal for EQing from a hardware control surface or for viewing a large automated mix. Best of all, it works with a large number of third-party plug-ins!
3. Target Playlists
This feature is child’s play to use — you simply go to the Target Playlist menu embedded in the Playlist Selector menu and select the Target Playlist. After it’s selected, the Target Playlist will be displayed in blue text next to a target icon. In the Playlists Track View, the new Target Playlist button turns blue. Clicking these target icons is another way to assign a Playlist as a target. You can also assign a Target Playlist via key command.
The Target Playlists function includes several other key commands to speed up your workflow. You can copy or move clips to the Target Playlist from Waveform View or any other Track View, bring the designated Target Playlist to the Main Playlist, or toggle between the last two viewed Playlists. These key commands are mapped in EUCON, so they work with the softkeys on Avid control surfaces.
Target Playlist Shortcuts
Shift + Command + Up Arrow (Mac)
Shift + Control + Up Arrow (Win) Cycle In Audio from Previous Playlist
Shift + Command + Down Arrow (Mac)
Shift + Control + Down Arrow (Win) Cycle In Audio from the Next Playlist
Shift + Opt + Up Arrow (Mac)
Shift + Alt + Up Arrow (Win) Copy Selection to the Target Playlist
Shift + Opt + T (Mac)
Shift + Alt + T (Win) Move a Selection to the Target Playlist
Shift + Command + Right Arrow (Mac)
Shift + Control + Right Arrow (Win) Designate the current Main Playlist as the Target Playlist of tracks with the edit selection on them
Shift + Right Arrow (Mac and Win) Bring the designated Target Playlist to the Main Playlist
Shift + Left Arrow (Mac and Win) Toggle between the last two viewed playlists
Building comp tracks in Waveform View is incredibly efficient — it’s certainly a lot easier than doing everything from the Playlists Track View in the Edit Window. The freed-up screen real estate makes it easy to monitor multiple mic scenarios while editing. You also have more screen space for plug-ins and other tools. Beyond that, you can cycle audio within a clip selection, allowing you to easily audition and paste in selections of audio from alternate playlists while keeping your comp in the Main Playlist.
4. Retrospective MIDI Record
Retrospective MIDI Record works behind the scenes — almost like magic. During playback, Pro Tools enters into a listening mode whenever a MIDI or instrument track is record-enabled, even if you’re not recording. If you want to recall the performance after you stop playback, go to the Event menu or use the shortcut, Shift + Option + Z, and Pro Tools will add the performance to the timeline.
5. Track Presets
Saving a Track Preset is as easy as right-clicking on a track’s name plate, selecting from the track menu, or using Option + Shift + P (Mac) or Alt + Shift + P (Win) key commands. This opens a Save Track Preset dialog that allows you to select your preset’s category, embed any desired audio/MIDI clips, and add a Tag to make your preset easy to locate. When you save a Track Preset, you capture a broad range of parameter settings along with it, including automation, sends, plug-in settings, mapping and track offset options, and session data.
Recalling a Track Preset is just as easy. Select it with the New Track dialog, or use the Workspace to search by the tags or name of the preset. Easily drag and drop presets into your session from the Tracks Preset Category in the Workspace, or right-click and use the import Track Preset option. When you recall a Track Preset, you have complete control over which parameter settings are applied, and you can change these settings each time you recall the preset without altering the original data.
Besides providing you easy setup for drum buses, vocal chains, and other track types, Track Presets are also useful for saving and recalling complex virtual instrument configurations. We’ve also used it to capture quick ideas by saving MIDI patterns and audio loops. Beyond that, it’s great for saving frequently used drum patterns and their corresponding virtual drum configurations in one, easy-to-access place. No matter how you use it, the Track Presets function is a welcome workflow enhancement. With it, you’ll spend more time being creative and less time managing tracks.
6. New MIDI Editing Shortcuts
Use Shift + Up/Down to transpose a MIDI note higher or lower by an octave. You can also use Control + Up/Down (Mac) or Start + Up/Down (Win) to transpose a MIDI note higher or lower within the same key (make sure you’ve selected the correct key in the session’s Key Signature ruler). If notes are too long or too short, you can trim or lengthen them by a single grid value with Control + Left/Right (Mac) or Start + Left/Right (Win). You can also use Control + Shift + Left/Right (Mac) or Start + Shift + Left/Right (Win) to trim or lengthen notes by two grid values.
Beyond that, you can tighten up a MIDI performance with Command + Up/Down (Mac) or Control + Up/Down (Win), which increases or decreases a note’s velocity by five steps. Add the Shift key to either of these combinations, and you can increase or decrease the note’s velocity by 15 steps.
At Sweetwater, we appreciate being able to transpose, trim, and adjust MIDI notes without touching a mouse. These keyboard shortcuts are guaranteed to turbocharge your workflow!
MIDI Editing Shortcuts
Up/Down Arrow Transpose one semitone
Shift + Up/Down Arrow Transpose one octave
Control + Up/Down Arrow (Mac)
Start + Up/Down Arrow (Win) Transpose in key
Control + Left/Right Arrow (Mac)
Alt + Left/Right Arrow (Win) Move Note On position one grid value
Option + Left/Right Arrow (Mac)
Start + Left/Right Arrow (Win) Move Note Off position one grid value
Control + Shift + Left/Right Arrow (Mac)
Start + Shift + Left/Right Arrow (Win) Move Note On position two grid values
Option + Shift + Left/Right Arrow (Mac)
Alt + Shift + Left/Right Arrow (Win) Move Note Off position two grid values
Command + Up/Down (Mac)
Control + Up/Down (Win) Change Velocity by five
Command + Shift + Up/Down (Mac)
Control + Shift + Up/Down (Win) Change Velocity by fifteen
Prev:AudioScience ASI5810
Next:MOTU MIDIEXPRESS128
Leave a message
Message List
Comments Loading...


